Ever since I learned how to properly host a website myself (i.e. rent my own VM, setup a web server and firewall, point DNS to server, serve web pages), I wanted to also host my own email. When I looked at this 10-15 years ago for menucosm, all the advice I found online could be summed up as: don’t bother, it’s too much hassle and not worth the €60/year it cost at the time to pay Google to host it, so that’s what I did.
Last year, I started working on a side-hustle, selling custom Lego sets I designed myself. Since this was a side-hustle and I was already paying for my own web server, I decided to try and keep things as lean as possible, which meant hosting the e-commerce site myself. No issues here: I found a PHP e-commerce package, installed it and wrote my own custom theme. Obviousy I would need email for this, for payments, orders, contacts etc.
I’d dockerized my setup on my web server over the years, so I now have a number of sites, all dockerized, sitting behind a reverse proxy webserver, powered by the excellent nginx-proxy. One of the great things about nginx-proxy is that it can handle SSL certificates for you automatically via Let’s Encrypt, for all your sites behind the proxy server, very convenient.
Being behind nginx-proxy is the only slightly unusual thing about my setup that might not apply to everybody trying to follow this guide. I use it for the SSL certs, but Docker Mailserver (see next paragraph) also can handle this for you, but I’ll let you figure out how yourself.
The great thing about docker and virtualization is that plenty of people have built complicated but reusable images. Since it was 2025, I knew there must be dockerized email setups and sure enough there are. The one I went for in the end was Docker Mailserver. I also needed a UI for webmail and configuration, so after I read about Rainloop, I found a docker image for that also. Now I just needed to set it all up.
For the sake of this blog post, let’s say my website is example.com and my mail server will be mail.example.com.
I’ve been using this setup for about 9 months so far, and as far as I can see, all has been running smoothly. From the very beginning, Google was accepting my test emails (i.e. from my new webmail to my existing gmail account), not marking anything as spam. I receive emails directly and through the website and these seem to be delivered successfully also. All good as far as I know.
One important thing before starting
Many hosting providers, including my own, have port 25 blocked for all outgoing connections. This is to prevent a server maliciously getting taken over and used for spam. I had to contact the support team, tell them what I was up to, promise I’d be dilligent and then ask them to open the port, which they did. I wasted about 1 – 1.5 weeks trying to unsuccessfully work with port 25 closed, which I was poorly advised to try by their support team, before finally realising it MUST be open and they were subsequently OK about opening it!
So make sure port 25 is open at your hosting provider before proceeding.
Docker Mailserver
The documentation for this package is fantastic. It’s ready to use out of the box with configuration all going into the provided mailserver.env file. We’ll be working with the env file and it’s compose.yaml. So first off, get those 2 files from the repo and recreate them in a local mailserver folder. Also create a docker-data folder in there, which the mail server will use for persistence.
SSL Certs
As mentioned above, the nginx-proxy package handles all my SSL via Let’s Encrypt. To get this to work, you need to add some environment variables to your compose.yaml, see the new environment block below. Docker Mailserver needs to be able to read the various SSL files that nginx-proxy creates, so we also need to map a new volume for the folder that nginx-proxy writes to, that Docker Mailserver will know to read; see the final line under the volume block of docker-compose below.
compose.yaml
As mentioned above, this is largely ready to go out of the box. Here is my slightly edited one (see comments for this blost starting with #DC), with the environment variables for nginx-proxy & Let’s Encrypt, and the volume where SSL certs are stored:
There are a huge number of options here which are well explained in the file and in the documentation. I’ll detail the ones I thought were important:
1 2 3 4 5 6 7 8
SPOOF_PROTECTION=1 ENABLE_POLICYD_SPF=0# since I'll be using RSPAMD ENABLE_OPENDKIM=0# as above ENABLE_CLAMAV=1 ENABLE_RSPAMD=1 ENABLE_RSPAMD_REDIS=1 ENABLE_FAIL2BAN=1 SSL_TYPE=letsencrypt
Bring up the server
At this point we’re ready to start the mailserver. This all just runs on the CLI, there’s no GUI until we install Rainloop. So, from within our mailserver folder, we simply do:
1
docker-compose up -d
Creating first accounts
Before setting up all the DNS records, the documentation recommends to create an email account, so let’s do that. We’ll also create a ‘postmaster’ alias for this; it’s standard practice to have a ‘postmaster@’ account, it’s up to you whether or not to have it separate or alias it. We’ll be using the postmaster account in the next section.
In order to prove you’re sending valid email, i.e. you are who you say you are and you’re not spoofing a service, certain DNS records need to be setup. For this, you’ll need to access your control panel in your DNS provider (usually whoever you registered your domain with).
Once all the below is done, I suggest waiting a day before moving on to the Rainloop section, in order for your DNS changes to propagate around the world.
A Records
First up, let’s setup up some A records and the MX record. Using your server’s IP address, I would suggest setting up A records for:
mail.example.com
webmail.example.com
mta-sts.example.com
For the last of these domains, you also need to configure your primary webserver to also host it (i.e. to respond to requests for mta-sts.example.com), along with your www site. The site doesn’t need to look perfect at this domain, just respond to the initial request.
Next we want to create an MX record. You can leave the Host name blank, use the default TTL (mine’s 1 day), priority 10 and set Result to mail.example.com.
DKIM, DMARC and SPF
These next parts are key for sending email successfully. I’ll roughly outline what to do, but more info can be found at the Docker Mailserver guide for this.
DKIM
For DKIM, as per the guide, you can set this up via
1
docker exec-it mailserver setup config dkim
Assuming you’ve kept the same volume structure from compose.yaml above, this will output files into ./docker-data/dms/config/rspamd/dkim. Have a look at the contents of rsa-2048-mail-example.com.public.dns.txt and copy them to the clipboard. Go back to your Control Panel and create a new TXT record, using mail._domainkey as the Host name value, paste in your copied data to the Result field, use the same TTL as before and save.
DMARC
For DMARC, you just need to create another TXT record. Use _dmarc for Host name. For Result, the guide gives you some defaults, as well as linking to a generator where you can come up with your own. You’ll want to use the postmaster@example.com alias for this: this is how other mailservers will send you reports on issues they’ve encountered with your service. For reference, I went with the following: v=DMARC1;p=quarantine;pct=100;rua=mailto:postmaster@example.com;ruf=mailto:postmaster@example.com;adkim=s;aspf=r
SPF
This is one is simple enough. Simply create another TXT record with an empty Host name and the following for Result: v=spf1 ip4:your.ip.address -all
Other Records
Above, I said to create an A record for mta-sts.example.com. In addition to this, we want to create a TXT record with Host name set to _mta-sts and Result set to v=STSv1; id=yyyymmddxx, where yyyymmddxx is the value of the Serial Number field in your DNS control panel. Once this is done, you need to create a corresponding .well-known/mta-sts.txt file in your primary website’s root folder, i.e. so it’s accessible at https://www.example.com/.well-known/mta-sts.txt and https://mta-sts.example.com/.well-known/mta-sts.txt. Set the contents of this file to:
Finally, I also have the following TXT record, so I suggest you set it up also: Host name of _smtp._tls and Result of v=TLSRPTv1; rua=mailto:postmaster@example.com.
Reverse IP Address
Once we’re done with all the DNS records, we need to setup a reverse IP lookup. We do this in the admin/control panel of your hosting provider. Each hosting provider is different, but with mine it was pretty straight forward. I found the page I wanted under Network > Public Networks. In here, I added a new entry to the existing table, setting IP Address as my server’s IP and Reverse DNS Name as mail.example.com.
At this point, restart your mailserver docker machine (just to make sure all changes are in effect) and at that point, if all goes well, you’re actually hosting a proper mail server! Now we just want a way to interact with it…
Aside: Connect to nginx-proxy
My nginx-proxy server connects to an internal docker network, to which all sites behind the proxy must connect. Let’s say mine is called DCNET, so once you’ve restarted the image, connect to the network via
1
docker network connect DCNET mailserver
Rainloop
Again we’re going to be using a docker image and a github repo here, wernerfred/docker-rainloop. Above we created a mailserver folder; for Rainloop, I created a rainloop sub-folder in here, but you can create it at the same level as mailserver if you prefer. We’re going to create a second compose.yaml file; you could ultimately merge this with your compose.yaml from above, but that’s beyond the scope of this article. My rainloop instance will run on port 9009.
version: '3'
networks:
DCNET:
external: true# name of the network that nginx-proxy connects to
services:
rainloop:
image: wernerfred/docker-rainloop:latest
container_name: docker-rainloop
restart: always
volumes:
- rainloop_data:/rainloop/data
- ./000-default.conf:/etc/apache2/sites-available/000-default.conf
- ./ports.conf:/etc/apache2/ports.conf
- ./apache2.conf:/etc/apache2/apache2.conf
environment:
VIRTUAL_HOST: "webmail.example.com"
VIRTUAL_PORT: "9009"
LETSENCRYPT_HOST: "webmail.example.com"
networks:
- DCNET
volumes:
rainloop_data:
If you look under volumes, you’ll see 3 local files mapped in to the image. These configure Rainloop’s internal server (running Apache) to work off the correct port, set log formats and more. For simplicity, I’ll just paste the contents of each:
This file is a bit long, so what I suggest is to simply copy the contents of /etc/apache2/sites-available/000-default.conf from inside the rainloop image, save it as 000-default.conf and append the following line:
1
ServerName"webmail.example.com"
Bring up the server and enjoy!
OK, hopefully everything will be configured correctly, so now all you need to do is bring up the server. So, within the rainloop directory you can do
1
docker-compose up -d
then head on over to webmail.example.com and you should see your nice webmail interface! You’ll want to configure it straight away by going to webmail.example.com/?admin, log in using admin / 12345 as the username and password, change your admin password and then set any other configuration you like.
Finally, going back to the root webmail login, you should be able to log in with the account you created above. At this point, you should be up and running, able to send and receive emails. Now, think of what you’re going to spend the €60/year you’re saving on!
I’ve recently started building a new web app and have decided to build it in Symfony (and hopefully ultimately Vue for the front-end), as a way of learning what looks like a really cool framework. I’d had an introduction to Symfony through work, then did some online courses, including a load of the excellent SymfonyCasts, so have a reasonable amount of knowledge now on the subject.
One cool feature of Symfony is its form handling abilities. Using simple annotations and generated code, you can get alot of functionality around submitting, validating and saving your form data for very little effort. When rendering a form to the user, Symfony’s template handler, Twig, has a load of built in functions to render each field, such as form_widget to display the field’s HTML tag, form_label to display a field’s label, form_row to combine the above 2 and 2 more, etc. These can be overwritten, so you can style/theme your form using your own CSS, while keeping Symfony and Twig’s powerful form functionality. More details can be found on Symfony’s form customization page.
One thing I found was that sometimes you don’t really need to modify the original form_widget, you just need to say wrap its contents in a div with a specific class. So, ideally there’d be a way to overwrite form_widget but still call the parent/original one. Luckily there is, but it was a little tricky to figure out.
Let’s say I need to add a <div class="select"> around a particular field. For this, we can overwrite the choice_widget function, which generates <select> tags. In your form theme you can do something like:
And you’d think that would work no issues! However, I kept getting errors along the lines of “Can’t call parent function” or “parent function does not exist”, or something like that. I found it surprising, because you can simply call choice_widget before you add your code to overwrite it, so the function must be in the global scope, right? Well, somehow it isn’t! Luckily the fix is simple: import the base Twig theme at the top of your own theme:
1
{% use 'form_div_layout.html.twig' %}
And voilá! You should now have your select wrapped in its stlystyled div.
This article is about how, at Smartbox, we improved our release process over a period of around 2 years, going from ad hoc releases, with little structure and performed outside of business hours, to having fully managed processes and releasing during the day, only reverting to releasing outside of office hours if absolutely necessary.
When I joined, we had 2 teams doing releases of our public facing e-commerce website, each containing between 7 and 10 developers and testers, reporting to a Web Manager. One team looked after the e-commerce site, while the other took care of people who received one of our boxes as a gift. Now, there are around 8 different teams who could potentially release to the public website, as well as other teams releasing various ancillary micro-services.
Chaos
This story begins around 2015, when I joined Smartbox. At that time, we were a much smaller organization (~280 people in total, vs. 600+ today). The teams working on the platform worked in 2–3 week sprints and would do a release at the end of each.
Process
A team would get in touch with the Web Manager as they approached the end of a sprint and had a release candidate ready to go out. There was rarely any scheduling conflicts, so he would just say ‘OK, go live on Wednesday’ or similar. The release process would start going to pre-production during the day, followed by production at around 10 PM (everyone working remotely from home). When ready to begin on production, we would put the site behind a maintenance page, start the deploy (including any extra required steps), kick off the regressions and do manual UAT on production. To finish up by midnight was a rarity, but usually, we would be done by 2 AM, at which stage we would remove the maintenance page and go to bed.
It should be obvious that there were a number of issues with this:
When there were issues and the release dragged on, people would get tired and ‘just want to finish’
After the release was deployed, everyone would just go to bed and no further monitoring took place, which could lead to nasty surprises for your colleagues the next morning
There wasn’t a full set of engineers and management for support during the release if there was an issue
Why duplicate the UAT effort, when it was already done twice on a project and pre-production environment
On top of all this, there was no record of a release. The codebase is versioned with git tags but there was no centralized list detailing what was in each release, what team did it, issues encountered, etc.
Release Plan
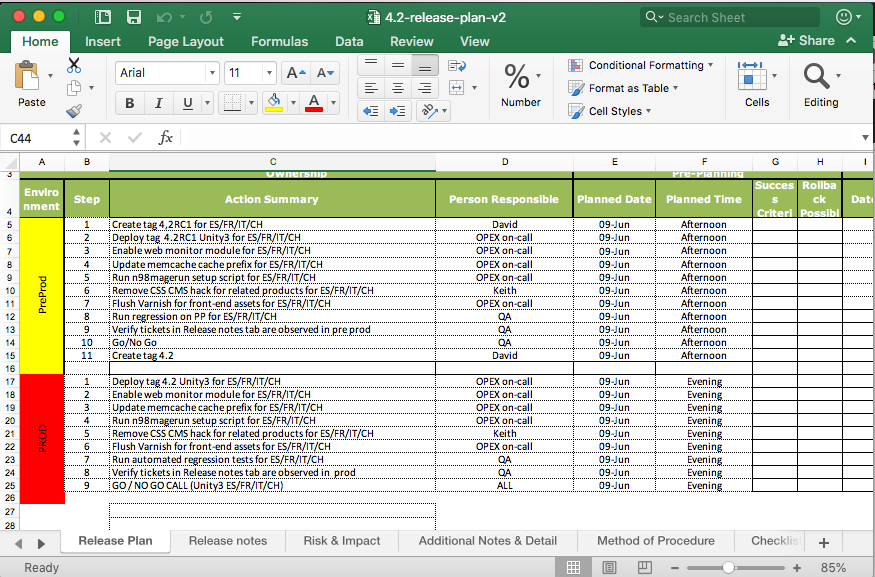
Each release would have (and still has) a release manager, to coordinate all the steps involved in deploying code. In preparation for a release, the manager would fill out an Excel spreadsheet of all the steps for pre-production and production; this was the Release Plan. Often certain tasks need to be carried out on the production server, and these would be done by an infrastructure engineer, so the Release Plan would have the extra info for them. This plan would just be emailed/shared via chat to whoever needed it and would essentially then be lost forever after the release. This also made it hard for a new release manager to come along, as they had no frame of reference for the Release Plan
A sample Release Plan from 2015. Note the Method of Procedure tab — there would be extra info in here, which required flipping between this tab and the Release Plan tab — awkward! Also, the list of tickets went into Release Notes — a manual copy and paste effort
While we’ve always had a suite of unit tests, it was up to the developer to run them locally and ensure nothing had broken. However, sadly the tests weren’t always run and there were instances where we would release code with a simple unit test bug in it.
We also had no way of tracking database changes, or what state the database was in. In Magento (which is what our e-commerce platform is based on), to do a DB change, you write a script called an installer. The installers are versioned in Magento, so it’s possible to tell what state the DB is in by looking at the current version of each installer. Often, when deploying, either the installer wouldn’t run, or there would be a DB refresh on pre-production and various other issues. This resulted in a lot of lost time trying to figure out why various functionalities were broken. We had no way of definitively and easily saying ‘this is what the database should look like’ after a deploy.
Summary
Infrequent, nighttime releases
Nothing was tracked or centralized
Buggy code got released
Improvements
The company knew it was about to expand its workforce massively over the next few years, since it was acquiring competitors and had big plans to build a brand new back-office infrastructure. More development teams was always going to result in more releases, so it was pretty evident that we were going to need a new process whereby there could be a release every day or even multiple releases on the same day.
Additionally, not all these teams would be working on the same codebase. This enabled a relaxing of the restriction that one team could release per day. However, we still needed more control over who released what and when
Process
We started by having a weekly meeting on Fridays, where the Manager or Tech Lead of each team looking to release the following week would attend, explain what they were releasing and when they wanted to do so. The meeting was coordinated by the ‘gatekeeper’, although that phrase never really caught on! It was all very analogue and manual, involving hand-drawn calendars, lots of (amicable) discussion and the gatekeeper keeping track of everything. When everything was decided, an email would be sent out with the plan for the following week.
Another improvement we made at this time was to begin releasing during the day. We realized the maintenance wall was overkill for most releases, especially ones that weren’t changing the structure of the databases. We also reduced a lot of the required UAT, since it had already been done on a different environment, so it was a pointless duplication of effort.
Move to gitlab, Continuous Integration/Continuous Deployment
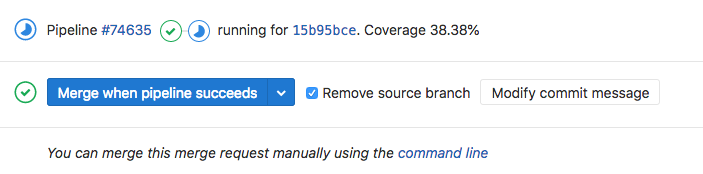
It was at this point also when we moved from doing everything in Git via the command line to having our entire codebase hosted in gitlab. This meant building a release candidate would be as simple as clicking a ‘Merge’ button for each ticket in your upcoming release. Other tasks like merging to master, creating a tag, resolving conflicts could all be done via clicks of the mouse.
Moving to gitlab also enabled us to begin initial attempts at CI/CD. As mentioned above, often a developer would commit PHP code on a feature branch that broke a PHP unit test. To alleviate this, we built pipelines in gitlab so that when a branch was pushed, we would run the unit tests in a docker container and only when the pipelines were successful could a feature branch be merged into a release branch.
gitlab integration: only merge after the tests have passed
Once we had that pipeline in place, we were able to add other pipelines, e.g. to generate our zipped up Javascript app.min.js file, a PHP Composer run and we even started to work on a front end unit test suite using Karma and PhantomJS.
Release Plan
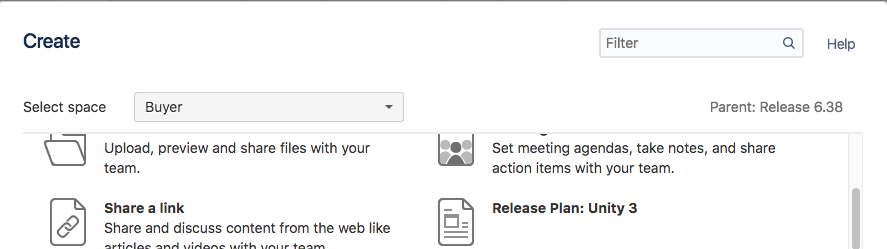
Around this time, we moved away from our in-house wiki and started using Atlassian’s Confluence instead. This allowed us to create a Release Plan Template, which could be used as a basis for all Release Plans. In this template, we added every single conceivable step that could be requested during a release, with all the extra information in the one document. So, when someone started doing a release, all they would have to do is create a new file using the template and generally remove steps. Obviously, anything very specific to that person’s release could also be added in as appropriate.
Using these Confluence templates also meant that we now had a single source for all release plans and they could be shared with a URL, worked on at the same time and kept up-to-date.
Easily create a new Release Plan using this template
Summary
Daily releases, weekly release planning meeting
Use of gitlab, pipelines for verification and asset generation
Standardized and centralized release plans
Sanity
Process
As we continued to grow, the company hired a Change Manager, with a proper background in change management. This Change Manager is still in place today and closely follows all releases throughout the company, to make sure they’re progressing, there are no clashes and that everything stays organized. Several chat rooms around release coordination, production issues and the like were created, which helps people collaborate on who’s doing what and when.
We started using a system called Service Desk to track all changes, or Production Change Requests (PCR) as they’re called. An advantage here is that a record of ALL changes are maintained, with issues and resolutions attached, so it’s very easy to go back and see what happened, and most importantly: what was the solution, if an issue re-occurs.
Finally, we introduced a morning standup, called the Change Advisory Board (CAB) where people talk about what they’re hoping to do over the current and following day, as well as discussing any on-going production issues.
So, we’ve gone from ad hoc releases to having the following well-established process:
Build your Release Plan
Outline your change in a PCR on day-2 (or earlier!)
Go to the CAB on day-1
Announce you’re ready to release in a chatroom on your go-live day
Start releasing when you’ve got confirmation it’s OK to proceed
If one does encounter issues while releasing, these are also now tracked in the Release Plan, along with any corresponding tickets that are raised for other teams to fix. Every Monday morning, there is a meeting to discuss issues teams faced the previous week and to ensure these are being resolved by the Operations team. This ensures we don’t keep facing the same problems (repeat offenders) when releasing and that problems do actually get fixed.
Release Plan
Not much has changed in the Release Plan. The overall structure has evolved into different sections, we track the timings for each step, as well as issues encountered, as mentioned above. We also include results from automated tests, which helps to see if an issue has occurred before.
Summary
Have a dedicated change manager
Centralize and track ALL changes
Communicate everything you’re doing in a standard way
Dreaming?
Ultimately we would like to move to a true Continuous Integration set-up, whereby when you finish a ticket, you simply merge to master and everything from there is automatic. We would move away from having Production and Pre-Production servers, to having a Blue/Green set-up, where both are Production-ready and it’s simple to flip between the 2. The release process would then consist of a developer doing the following:
Merge branch to master
This kicks off running the unit tests
Deploy master to ‘blue’ server on success
Run the regressions
Flip ‘blue’ and ‘green’ servers on success, so blue is now serving the code and includes the branch just merged
We’ve put a certain amount of this in place, with gitlab and the pipelines, but we’ve some way to go before we achieve this dream scenario.
TL;DR even the summaries
Centralize and track ALL changes!
Automate as much as possible (pipelines, unit testing)
Communicate in a standard way (i.e. have a fixed place/process to announce what you’re doing)
A general rule I follow when using KnockoutJS is that there should be no DOM manipulation in the viewModel. The viewModel should be completely independent of any markup, while any changes to the DOM (via jQuery or otherwise) should be handled in the binding handler. This makes your viewModels much more portable and testable.
As I’m sure you’re aware if you’re reading this article(!), KnockoutJS’s binding handlers are applied to an element and have init and update functions that get called when a certain value in your viewModel changes. Within your init function, you can set up various DOM-element-specific jQuery handlers, while within your update function you can perform various DOM manipulations, trigger events etc., as well as reading from/updating your viewModel and much more.
A common situation I’ve come across a number of times is: say you have a big div with plenty of buttons and links that are tied into external jQuery plugins and DOM elements and you want to perform certain actions when they’re clicked or when other changes happen in your viewModel. You don’t really want to have loads of binding handlers for each separate change that might happen in your viewModel, your codebase could get quite big quite quickly. What I’m about to propose is a structure of how to apply 1 binding handler to the entire div, then call various functions to manipulate the DOM outside of your update binding handler function, via the viewModel.
So, I’ll start with the viewModel. I’m going to have an observable action attribute and 2 functions linkClicked and buttonClicked. (Please bear in mind, this is a very simple example for illustration purposes, you wouldn’t really call viewModel functions linkClicked etc.!) There’ll also be a resetAction function, which will be explained shortly.
1 2 3 4 5 6 7 8 9 10 11 12 13 14 15 16 17 18
exampleViewModel =(function($){ var viewModel =function(){ this.action= ko.observable(''); };
viewModel.prototype.resetAction=function(){ this.action(''); };
viewModel.prototype.linkClicked=function(){ this.action('jQLinkClicked');// prepended "jQ" to the function name to help the reader later };
viewModel.prototype.buttonClicked=function(){ this.action('jQButtonClicked'); }; //JS Module Pattern return viewModel; }(jQuery));
So now we can see that whenever we click either the link or the button, our action attribute will be updated and thus trigger the update function in the exampleBindingHandler binding handler that’s applied to the div. Let’s look at that binding handler now:
ko.bindingHandlers.exampleBindingHandler={
init:function(element, valueAccessor, allBindingsAccessor, viewModel){ // do whatever initial set up you need to do here, e.g.
$('body').addClass('whatever'); },
update:function(element, valueAccessor, allBindingsAccessor, viewModel){ // so this will be called whenever our observable 'action' changes
// get the value var action = valueAccessor(); // reset to empty
viewModel.resetAction();
So you can see from the above how we can move from various different viewModel changes out to the binding handler and maniuplate the DOM in there. We read and save action from the valueAccessor, then reset it via the viewModel’s resetAction function, just to keep things clean.
At this point we have very simple alerts for each of our actions but of course in real life you’ll want to call your jQuery plugins, change the DOM etc. To keep things clean what we can do is have a simple JSON object with functions for each of the actions and within those functions do our heavy jQuery lifting, something along the lines of:
var _ ={
jQLinkClicked:function(){ // e.g.
$('.class').parent().remove(); },
jQButtonClicked:function(){ // e.g.
$.plugin.foo(); } }
ko.bindingHandlers.exampleBindingHandler={
init:function(element, valueAccessor, allBindingsAccessor, viewModel){ // do whatever initial set up you need to do here, e.g.
$('body').addClass('whatever'); },
update:function(element, valueAccessor, allBindingsAccessor, viewModel){ // so this will be called whenever our observable 'action' changes
// get the value var action = valueAccessor(); // reset to empty
viewModel.resetAction();
In my current job, we use Foundation for stuff like modal popups, fancy drop downs etc. I haven’t used it too much but I know for the modal dialogs you can either instantiate them via Javascript ($('#elem').foundation('reveal', 'open', {option: 'value'});) or via HTML attributes (<a href="#" data-reveal-id="elem">Open</a> and <div id="elem" data-reveal>).
Passing options to Foundation via Javascript is pretty trivial, as can be viewed in the example above. However, doing this via HTML attributes isn’t so straight-forward and I found the documentation online pretty hard to find. Luckily I was able to figure it out and it’s simple enough: you add a data-reveal-init attribute and a data-options attribute on your modal div. Each of the options are separated by semi-colons and are of the format option: value, e.g.
Recently I started a new job at a company that is looking to transition away from a customised, unstructured, jQuery module set up to use KnockoutJS and RequireJS for it’s modules. This approach was chosen because the core platform is based on Magento and the forthcoming Megento 2 uses KnockoutJS heavily throughout it’s frontend templates. As a good starting point and proof of concept, we decided to look at converting our existing custom-autocomplete module from a combination of EJS and jQuery to pure KnockoutJS. Luckily for me, I was the one who got to implement it, and thus learn a new skill!
I’m not going to go into the ins and outs of how KnockoutJS works but in short it’s a MVVM system, where you have Models, Views and ViewModels, the latter being the interface between the other 2, the client and the server. This autocomplete was a standard input field, whereby on typing 3 characters, an AJAX call is made to the server looking for strings that matched the search string and displayed a clickable list of results underneath the input field. Additionally, you could use the arrow keys to select items in the menu, as well as the mouse. We also have different instances of the autocomplete, to search for different types of entities (e.g. searching for a product vs. search for a place), so we need the code to work with each.
From this point on I’m going to assume at least a basic knowledge of KnockoutJS, how it uses data-bind etc.
The View Model
So, first up we’ll want an Autocomplete viewModel, to handle the DOM events in the view (e.g. keyup etc.), fetch data from the server and call the correct model to format the received data. It’ll have 2 observable attibutes: suggestions, an array of suggestion objects, and q, the incoming query from the user. As a parameter we’ll pass it the model type to format the suggestions (e.g. LocationSuggestion below) and we’ll have functions to fetch suggestions as JSON from the server (loadSuggestions), add them to our suggestions array (addSuggestion, formatting the data via the model along the way) and clear our array (clearSuggestions), as well a helper function to look for valid character key presses (validKey). None of this is overly complex and it’s well commented, so I’ll just leave the whole class here:
/**
* AutoComplete viewModel. Handles the observable events from the view, requests data from the server and calls
* the corresponding Model above to format fetched data
*
* @param options JSON object of options, to contain:
* - url: URL to request the search results from
* - suggestionEntry: required model (i.e. one of the above) to format the data
*/ function AutoComplete(options){
// KnockoutJS standard is to refer to 'self' instead of 'this' throughout the class. // It's because 'this' in a sub-function refers to the function, not the viewModel var self =this;
$.extend(self, options);
// Array to store suggestions received from the server
self.suggestions= ko.observableArray([]);
// Value of input field that user queries
self.q= ko.observable('');
// Attribute to store the current AJAX request. Means we can cancel the current request if the observable 'q' changes
self.ajaxRequest=null;
/**
* Append a JSON search result to our suggestions array. Instantiates the correct model to format the data
* (view is rendered automatically by KnockoutJS)
*
* @param suggestion JSON object, returned from search server
*/
self.addSuggestion=function(suggestion){
self.suggestions.push(new self.suggestionEntry(suggestion, self.q())); }
/**
* If the user has entered a valid search string (more than 3 latin-ish or punctuation characters), cancel the current AJAX request (if any),
* fetch the data from the server, format it and store in 'suggestions' array
*
* @param obj HTML <input> element (not used)
* @param event The event object for the triggered event (keydown)
*/
self.loadSuggestions=function(obj, event){ // if a valid, non-control, character has been typed if(self.validKey(event)){
self.clearAjaxRequest();// cancel current request var q = self.q(); // if they've entered less than 3 characters, just clear the array, which clears the suggestions drop down if(q.length<3){
self.clearSuggestions(); return; }
// request data from the server
self.ajaxRequest= $.getJSON(self.url,{term: q},function(response){
self.clearSuggestions();// clear out current values for(var i =0; i < response['suggestions'].length; i++){
self.addSuggestion(response['suggestions'][i]);// add search result } }); } }
/**
* Check what key was pressed is valid: if it was alphanumeric, space, punctuation or backspace/delete
*/
self.validKey=function(event){ var keyCode = event.keyCode? event.keyCode: event.which; // 8 is backspace, 46 is delete return keyCode ==8|| keyCode ==46||/^[a-zA-Z0-9\s\-_\+=!"£$%^&*\(\)\[\]\{\}:;@'#~<>,\.\/\?ÀÁÂÃÄÅàáâãäåÒÓÔÕÕÖØòóôõöøÈÉÊËèéêëðÇçÐÌÍÎÏìíîïÙÚÛÜùúûüÑñŠšŸÿýŽž]$/.test(event.key); } }
We also store the current AJAX request with the object in the ajaxRequest attribute. By doing this, we can cancel any existing requests as the user types more keys. So, when they type the first 3 characters, a request is fired off; when they type the 4th character, we’ll cancel the existing request if it hasn’t finished and do a new search for the longer string.
The Model(s)
For this example, I mentioned above that the user could be searching for locations or products; let’s go with a location search for this example. Below, we have a class LocationSearch, which takes a JSON object that was returned from our server, formats the matched string by wrapping <strong> tags around the bit of the string that was matched (via the global accentInsensitiveRegex function, which I unfortunately don’t have the code for), generates the URL for the result and translates the type of location found (.e.g city, county etc.).
/**
* Model for a location search result. Formats data to be displayed in the HTML view
*
* @param data JSON object
* @param q User's original query
*
*/ function LocationSuggestionEntry(data, q){ this.type=(data.type==='region'&&Number(data.id)>999)?'country': data.type;
var separator = data.url.indexOf('?')!==-1?'&':'?'; this.url= data.url+ separator +'autocomplete=1&ac-text='+ q;
this.id= data.id;
this.label= data.label; // wrap what the user typed in a <strong> tag var regexp =new RegExp('('+ accentInsensitiveRegex(q)+')','gi'); this.labelFormatted= data.label.replace(regexp,'<strong>$1</strong>');
So, for the HTML side, we need an <input> field for the user’s query and a <ul> for the search results. The <ul> will obviously be hidden if we’ve no results to show. We wrap the whole thing in a <div> with class autocomplete, which we’ll use when binding the whole thing together later.
For the <input> field, we bind our AutoComplete‘s q attribute to Knockout’s textInput data binding (textInput: q), so that every time the value of the <input> changes, q will too. Additionally, we want to fire our loadSuggestions function, which will check the length of q and fetch suggestions from the server if it’s greater than 3 characters; this is achieved by calling loadSuggestions when a Javascript keyup event is fired on the <input> (event: {keyup: loadSuggestions}).
The HTML for the <ul> is also fairly straight-forward. If we have any suggestions to show, we want to add the has-results class to the <ul> (css: {'has-results': suggestions().length > 0}) and of course hide the <ul> when there’s less than 3 characters typed in the <input> (visible: q().length > 2). Assuming we have suggestions to show, we loop through the suggestions array, displaying an <li> for each, containing the suggestion’s labelFormatted and translatedType, as well as adding some attributes to the surrounding <a> (data-bind="attr: {href: url ...).
To get all this working nicely, you’ll need CSS for the <ul> and it’s <li> children. Additionally, you might want code to look out for when the up and down arrows are pressed on the keyboard and highlight the next row correctly. The code I have for this isn’t mine, so I’m not going to put it here. However, I will point out that to add any fancy jQuery on your view, i.e. to handle these up/down arrow keypress events, you can use KnockoutJS’s custom binding handlers. This is to keep business and presentation logic separate from each other. So, in JS you’d have something like:
1 2 3 4 5 6 7 8 9 10 11 12 13 14 15 16 17
/**
* This custom binding is how knockout lets you set up your HTML elements. It's separate from the viewModel, which
* should purely deal with business logic, not display stuff.
*
* Sample usage: <input type="text" data-bind="autoComplete">
*/
ko.bindingHandlers.autoComplete={ /**
* Called when the HTML element is instantiated
*/
init:function(element, valueAccessor, allBindings, viewModel){ var $el = $(element);
// specific jQuery code goes here },
update:function(){}// not needed here };
The HTML for your <ul> would change to <ul class="autocomplete-results" data-bind="autoComplete, css: {'has-results': suggestions ... – note the addition of autoComplete on the data-bind.
Facebook have long had the ability for developers to write custom apps and embed them as tabs in people’s or company’s Facebook profile pages. What I’m talking about here is when you write your own HTML app and host it at e.g. https://fb.mysite.com, which is then embedded into profile pages via an iframe. These apps then have URLs like https://www.facebook.com/profile.site/app_123456789, where 123456789 is your app ID within Facebook.
I’ve written one such app, in PHP, which has sub-pages, so while the root is https://fb.mysite.com, using the app will call pages such as https://fb.mysite.com/product/1. Seeing as this is within an iframe, the URL within the browser remains at https://www.facebook.com/profile.site/app_123456789 while you browse around the app. I recently had a request from a client on how they could link to a sub-page from within a post on their profile page, so they wanted to post something like ‘Check out my product at <link>’, where clicking on the link will load up the iframe app and bring them to the specific product. This is achievable, but it’s not exactly straight-forward and requires some work on the developers behalf. In an ideal world the link would simply be https://www.facebook.com/profile.site/app_123456789/product/1!
The way I managed to achieve this was using Facebook’s app_data parameter. Here, you can pass any data you want to the variable and it’ll end up as part of the signed_request variable in $_REQUEST at https://fb.mysite.com/index.php . The way we’re going to structure these deeplinks is to pass a JSON object to app_data containing a page key, with the sub-page we want, in this instance products/1, so our deeplink is going to look like https://www.facebook.com/profile.site/app_123456789?app_data={page:products/1} . Not exactly elegant but it’ll have to do! You could simply set app_data to products/1, but there may come a time when you want to pass other data in addition to the page, so I opted to go down the JSON route.
Now that we know what to expect, we need to decode $_REQUEST['signed_request'] (which should be available to your https://fb.mysite.com/index.php), json_decodeapp_data from the result, validate page, then redirect the browser accordingly.
To decode $_REQUEST['signed_request'] I used Facebook’s PHP SDK. Once we have the signed request as an array, we decode the JSON from app_data. Then, we check for the presence of page, validate it (I’ll leave the validation code up to yourself!) and send them on their way. This is pretty straight-forward, so is probably best illustrated with some code:
TL;DR The MultiViews option in Apache automatically will map e.g. /xfz/ to /xyz.php
I was recently creating a new section of the website I work for and decided to opt for tidy URLs, for SEO purposes, instead of our standard.long?url=format URLs that we have elsewhere. Let’s say the new section I was creating was called David’s Boxes, so I wanted to have relative URLs like /davids-boxes/big/blue map to davids-boxes.php?size=big&colour=blue. Purely co-incidentally, there happened to be a defunct davids-boxes folder in our www directory, which contained an old WordPress install, which I prompty deleted (more on this later). Then, I set up rewrite rules in our www/.htacess to do the example mapping above.
Everything was working fine locally: /davids-boxes/ matched to /davids-boxes.php and /davids-boxes/big/blue mapped to /davids-boxes.php?size=big&bolour=blue, all as expected. However, when I put the .htaccess file onto our test server, I couldn’t get the rules to match properly: everything mapped to the basic /davids-boxes.php, i.e. with no extra GET parameters. I tried different order of rules, moving the rules to the top of the .htaccess etc., but nothing worked. Then I simply deleted the rules from the .htaccess, expecting /davids-boxes/ not to map to anything, but it still strangely mapped to /davids.boxes.php as before. This led me to believe there was another rewrite rule somewhere else (a fact that was also helped by the previous WordPress install). Searching the entire codebase, which includes all ‘sub-‘.htaccess files, yielded no results, so then I began thinking it might be the server…
I had a look in our sites-available Apache configs, expecting there may be some sort of obvious generic rewrite to map any e.g. /xyz/ to xyz.php; no such luck. Going through each line in the config, I noticed we had the FollowSymLinks and MultiViews options enabled in the <Directory> tag. I was familiar with the former, but not the latter. Investigating into MultiViews, it turns out this was the thing doing the automatic mapping I was experiencing! The documentation states “if /some/dir has MultiViews enabled, and /some/dir/foo does not exist, then the server reads the directory looking for files named foo.*, and effectively fakes up a type map which names all those files”. Such relief to figure it out. I checked with our CTO, he didn’t know how it got there, so after removing it on testing and doing a quick test, we got rid of it everywhere and my problems were solved.
I was doing a bit of work with Canvas recently, manipulating images in the browser and writing the results out to files. I was looking for a package that could do various effects on the images, such as sharpen, blur etc. and came across the Pixastic package used in similar applications. However, unfortunately, the website for the package is currently down and I couldn’t find much documentation on it anywhere. So, I had to look at the source code to figure out how to call the various functions. Not the end of the world, but I just thought I’d stick some simple examples here, to maybe help get others started with the package and to direct them to the source code for more information!
I got the source code from JSdeilvr.net, which is minified, but there is unminified source on GitHub.
The 3 functions I was looking to use were sharpen, brighten/darken and blur. I’ll go through each individually. Firstly though, I’ll mention that the first parameter to each function is a Javascript Image object, which obviously has a src attribute with your image’s contents. The whole point of this was that I was building a tool with buttons which, when clicked, would perform each of the functions above on the current Image. When applying a filter, it’s best track the current level of e.g. brightness, increase/decrease this value, reset the image to how it originally looked and then apply the filter with the new value. This is better than say brightening it by 10%, then brightening the result by 10% again.
Seeing as I used brightness for the example above, I’ll start with that. Also, to darken an image, you simply reduce the brightness value, obviously.
// initial code setup var img =new Image();
img.src='whatever';
img.original_src= img.src;// for doing the resets // add the current value of each filter to the Image
$.extend(img,{brightness:0, sharpen:0, blur:0});
// ...
// 'Brighten' button click handler
$('#brighten').click(function(){
img.brightness+=2;// brighten by 2 (for darken, reduce by an amount, will work with negative values) // max brightness of 255 if(img.brightness>255) img.brightness=255;
// now we reset the image by creating a copy
img.src= img.original_src; // now, apply the filter
img = Pixastic.process(img,"brightness",{
brightness : img.brightness }); });
For sharpen, I found it best not to sharpen by the same amount each time, it just didn’t lead to nice results.
// now we reset the image by creating a copy
img.src= img.original_src; // now, apply the filter
img = Pixastic.process(img,"sharpen",{
amount : img.sharpen }); });
Lastly, blur was a bit more straightforward, increasing by 1 every time:
1 2 3 4 5 6 7 8 9 10
$('#blur').click(function(){
img.blur++;
// now we reset the image by creating a copy
img.src= img.original_src; // now, apply the filter
img = Pixastic.process(imageObjs[selected_image].image,"blur",{
amount : img.blur }); });
As I’m sure you’ve spotted, there’s a certain amount of repetition in the code above, starting with the line “// now we reset…”. What I did was to write a function called applyFilters, which you call once you’ve calculated your new value for brightness/sharpen/blur. This will then reset the image and apply all 3 filters. With the code above, if you were to say brighten, then blur, only the blur would be applied, as the image is reset each time. Doing it this way removes that problem.
Sometimes in work we can be asked to do things we don’t like and recently I was asked to look into implementing one of those homepage takovers. Personally, I think these are awful and would like to think I wouldn’t degrade my site by implementing one, but they do make money and have a high click rate, so I can see why sites like to use them.
Normally they’re done using a fixed background wallpaper that’s clickable all the way to the edge of the page. However, I was asked to simulate this look using 2 existing skyscraper ads, 170px in width, to be positioned either side of the main content and fixed to the top of the page. Since it wasn’t entirely straightforward, I thought I’d block about it here, to help anyone else in a similar situation. I’m not going to go into the specifics of displaying the ads, simply the CSS and Javascript involved in positioning them where you want them.
I should point out, this might be possible with just CSS, but changing a site’s fundamental structure to accomodate the new columns isn’t always possible. Also, you might only want the takeover on the homepage and not other pages. This solution should have minimal impact, as it simply adds 2 divs, that can go anywhere in the HTML.
So, to describe the set-up, let’s say our main content is 1000px in width, centred in the page and we want 2 170px x 1068px divs to contain our ads and line up on the right and left of that content, as well as for the 2 ads to remain fixed at the top of the page, no matter how far we scroll down. We’ll give each of these divs a class of side-banner, with left-banner and right-banner IDs. Since these are going to be positioned explicitly, it doesn’t really matter where in the HTML you put them, maybe just inside your main content div. Initially, we’re simply going to position them in the extreme top corners of each side. I’m also going to give them different background colours, so we can know they’re positioned correctly without having to worry about loading the ads (which can come later).
To align these alongside the content, I needed to write a Javascript function (position_banners()) to position them correctly. This function is called when the page finishes loading, as well as when the window is resized. It simply gets the body’s width, subtracts the width of our main content (remember 1000px), divides the result by 2 (as we’ve 2 sides), then further subtracts the width of our banners. This fairly basic formula works out the amount to move each div in from their corresponding edge, to line up with our main content. Then, we just use CSS left and right to position them nicely.
function position_banners(){ var margin =($('body').width()-1000)/2- $('#left-banner').width(),
left =Math.floor(margin),
right =Math.ceil(margin);
$('#left-banner').css({left: left +'px'});
$('#right-banner').css({right: left +'px'}); }
I know this code isn’t the tidiest, but should be enough to get the idea of what you need to do.
To further enhance the ‘takeover’ effect, you could display a 970px x 250px ‘billboard’ right at the top of your main content.